
Raycastの機能拡張をカスタマイズ
はじめに
最近、非常に便利なランチャーソフト「Raycast」を知りました。「Raycast Community Japan」の meetup イベントにも参加し、基本的な機能、よく知られた便利な機能は使えるようになりました。 https://singularitysociety.org/posts/articles/blog/2024-08-22-raycast/ しかし、Raycastの本領はそのカスタマイズ性にあり、高度な機能拡張だけでなく、Typescript、またはReactのテンプレートを編集して柔軟に機能拡張を行える便利な方法があります。 https://developers.raycast.com/basics/create-your-first-extension#create-a-new-extension Raycastがリリースされて4年経ち、様々な解説が出回っていますが、機能拡張のテンプレートについて詳しく書かれたものがなかったので、本記事で紹介したいと思います。ただでさえ、たくさんの機能拡張が公開されているRaycastですが、自分の手に馴染むようカスタマイズすることで、さらに無限の可能性が広がります。
Raycastは、Mac向けのキーボードランチャーで、ワークフローを効率化するための強力なツールです。Raycastの「Create Extension」機能を使用すると、ユーザーは独自の機能拡張を作成し、カスタマイズすることができます。この記事では、Raycastの機能拡張をカスタマイズする方法について、テンプレートの作例を使って具体的に解説します。
1. 機能拡張の概要
Raycastの機能拡張(Extension)は、特定のタスクやワークフローを簡素化するために作成されるスクリプトやアプリケーションです。これにより、コマンドラインツールの呼び出し、APIの統合、カスタムスクリプトの実行など、様々な操作を自動化できます。
2. 開発環境のセットアップ
Raycastでの機能拡張を作成するために、以下の開発環境をセットアップする必要があります。
- Node.js: Raycastの機能拡張はJavaScript(またはTypeScript)で書かれているため、Node.jsをインストールしておく必要があります。
- Raycastアプリ: 最新バージョンのRaycastをインストールし、Raycastのアカウントを作成してください。
3. 機能拡張の作成
ステップ1: 新しい機能拡張の生成
まず、Raycast を起動して「Create Extension」を実行します。
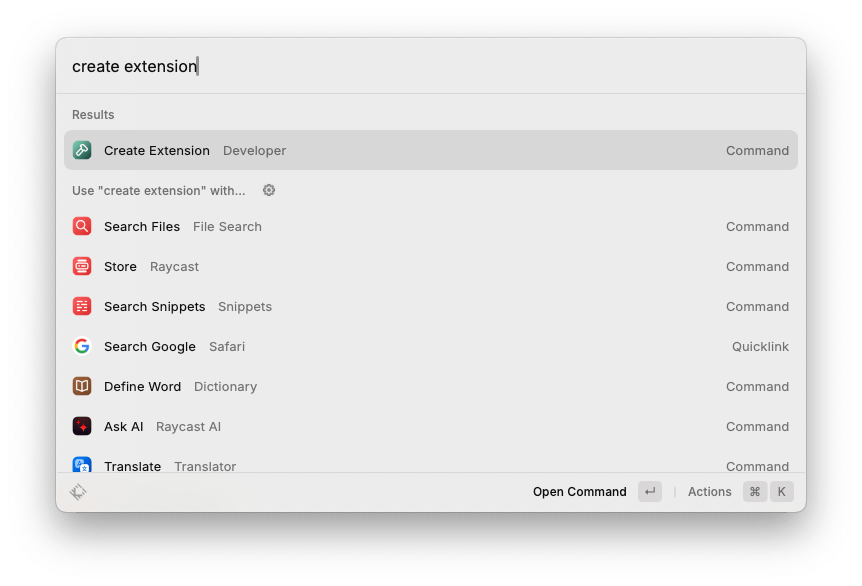
コマンドを実行すると、以下のようなダイアログが表示されます。
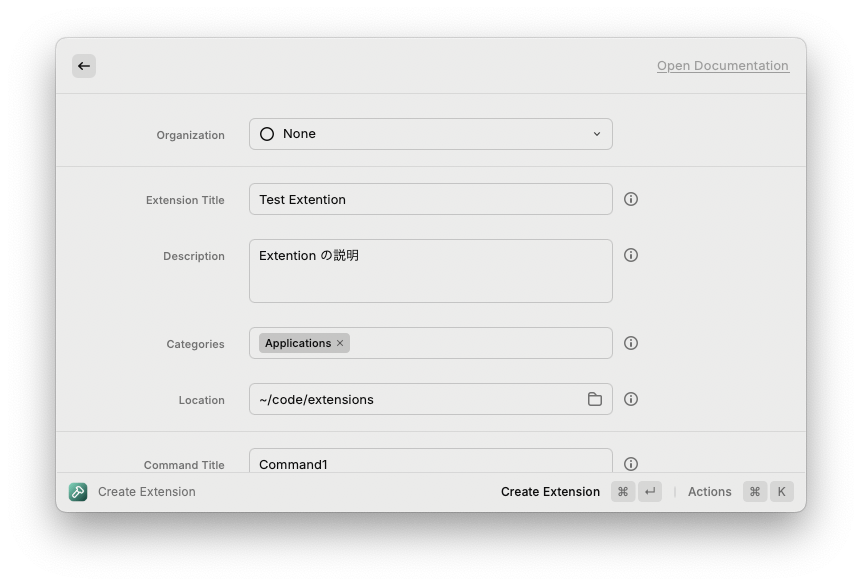

3つのセクション(Organization, Extension, Commands)からなり、Commandsは複数設定できるようになっています。
Organization セクション
- Organization: 「None」またはRaycastで管理する組織名を選択します。
Extension セクション
-
Extension Title: 機能拡張の名前(例: “My First Extension”)。 拡張機能のタイトルは、ストアと設定で使用されます。
-
Description: Raycastのコマンドリスト選択時に右側に表示される。説明はストアと設定で使用されます。
-
Categories: カテゴリーをリストから選択する。独自のカテゴリを入力することもできる。拡張機能がストアで公開されるときに使用されるカテゴリを少なくとも1つ選択してください。(Applications, Communication, Data, Design Tools, Developer Tools, Documentation, Finance, Fun, Media, News, Other, Productivity, Security, System, Web)
-
Location: 生成されるプロジェクトディレクトリのパス。拡張機能の開発ソースを含むディレクトリ。拡張機能名は、指定されたパスの最後に追加されます。
Commands セクション
-
Command Title: コマンド名。コマンド名はルート検索に表示されます
-
Subtitle: サブタイトル。サブタイトル(もしあれば)は、ルート検索のコマンドタイトルの横に表示されます。
-
Description: 詳細説明。説明は設定に表示されます
-
Template: 使用するテンプレートを選択します。 以下から選ぶ ( Blank, Show Detail, Submit Form, Show Grid, Show List and Detail, Update Bookmarks, Run Script, Show List, Show Typeahead Results )
-
Add New Command ボタン: Command Title以降を追加
右下の「Create Extension」ボタンをクリック、または「⌘ + Enter」キーで、プロジェクトのテンプレートが生成されます。
生成されたテンプレートには、基本的なディレクトリ構造とサンプルコードが含まれています。「Location」で示されるフォルダ内にextension名フォルダが作成され、配下のsrcフォルダ内のcommand名.tsx(またはcommand名.ts)ファイルを編集して、独自のロジックを追加します。
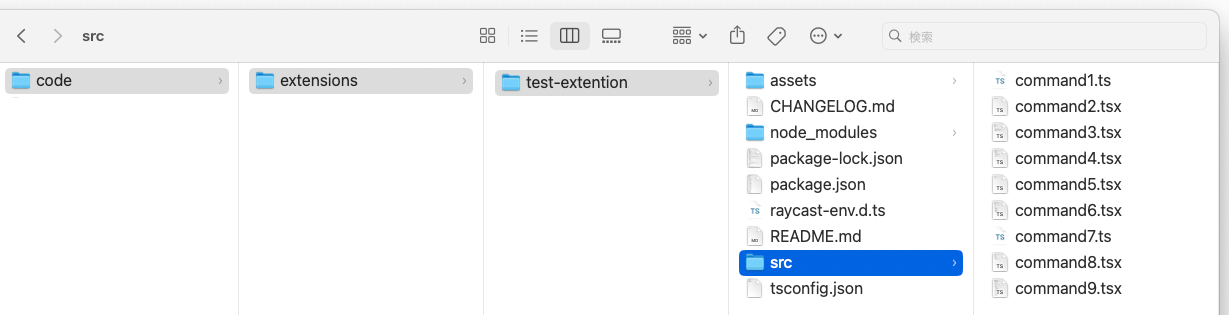
「Location」に「~/code/extentions」を指定した場合、このような構成でテンプレートが作成されます。
     ~/code/extensions
         extension名
             src
                 command名.ts
                 command名.tsx
                    …
恐らくテンプレートは随時更新されることが予想されます。以下は2024/8 現在の各コマンドテンプレートを1つの extension 配下に作ってみた状態です。フォルダ構成は以下のようになります。
機能拡張の設定画面はこのような状態になります。

テンプレートの概要
| # | template | mode | 概要 |
|---|---|---|---|
| 1 | Blank | no-view | 空の〜.tsファイルが作成される(何もしない) |
| 2 | Show Detail | view | markdown記法でHello Worldを表示する |
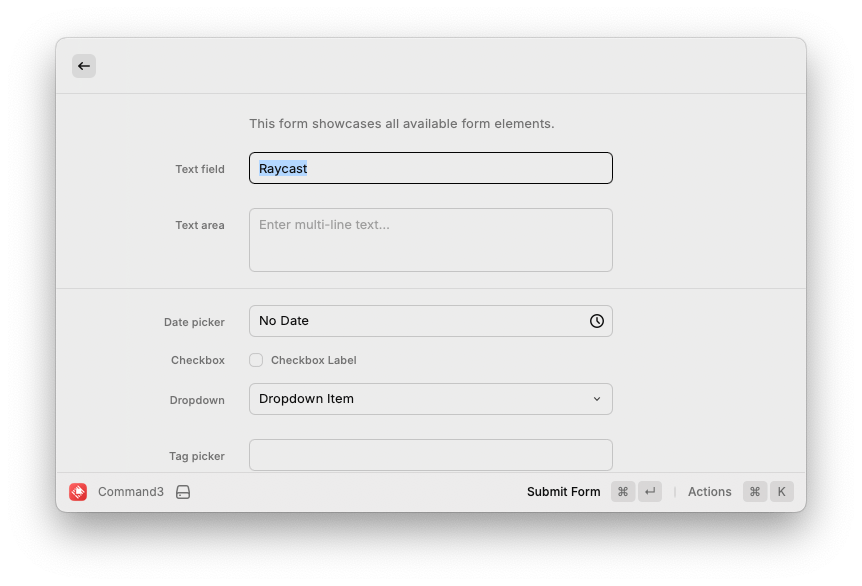
| 3 | Submit Form | view | フォーム画面(Text Field, Text Area, Date Picker, Check Box, Dropdown, Tag picker) |
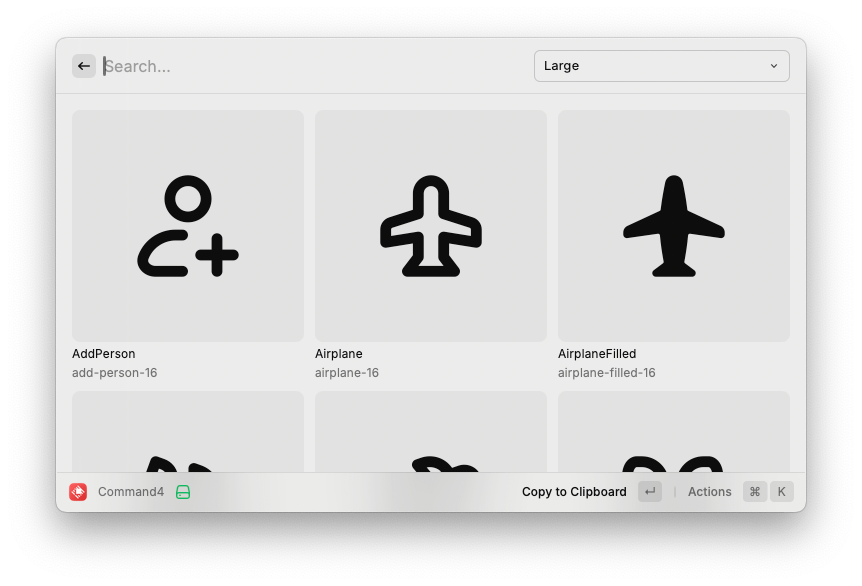
| 4 | Show Grid | view | グリッド画面(アイコンをグリッド表示し、選択するとアイコン名をクリップボードへコピーする) |
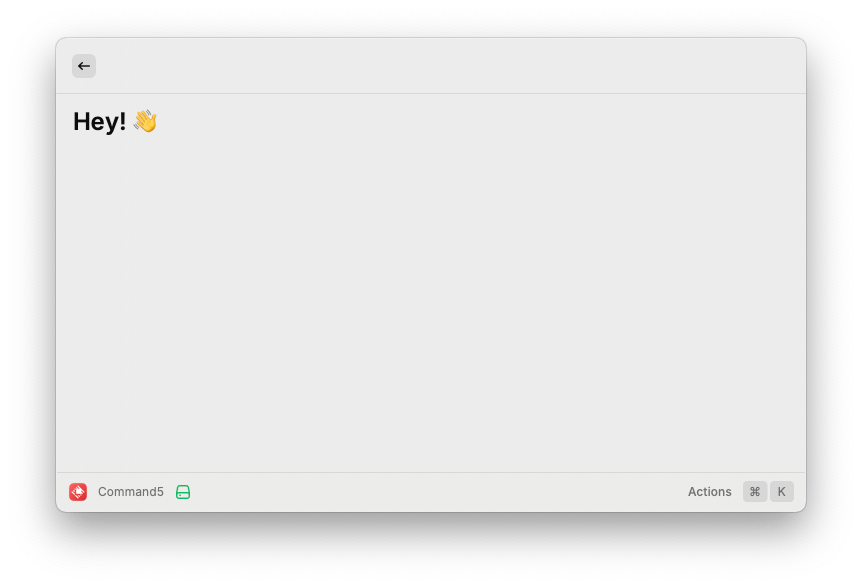
| 5 | Show List and Detail | view | リスト表示後、markdown記法でHey!と表示する |
| 6 | Update Bookmarks | menu-bar | OSXのメニューバーにブックマークアイコンが表示され、クリックするとメニューを表示する([[new-[Raycast Teams]], [Seen-[Raycast Store][Twitter]]]) |
| 7 | Run Script | no-view | クリップボードに今日の日付をコピーする |
| 8 | Show List | view | リストを表示し、選択するとタイトルをクリップボードにコピーする |
| 9 | Show Typeahead Results | view | https://api.npms.io/v2/search? を使ってnpmパッケージ内のテキストをサジェスト検索する |
各テンプレートについてコードと簡単な説明を掲載します。
- Blank コマンド実行後何もしません。GUIなしで自由に開発するためのテンプレートです。空の〜.tsファイルが作成されます。
- Show Detail
コマンド実行後、画面が表示されるテンプレートです。markdown記法でHello Worldを表示します。マークダウンで表現力のある読みやすい文章を簡単に作成できます。
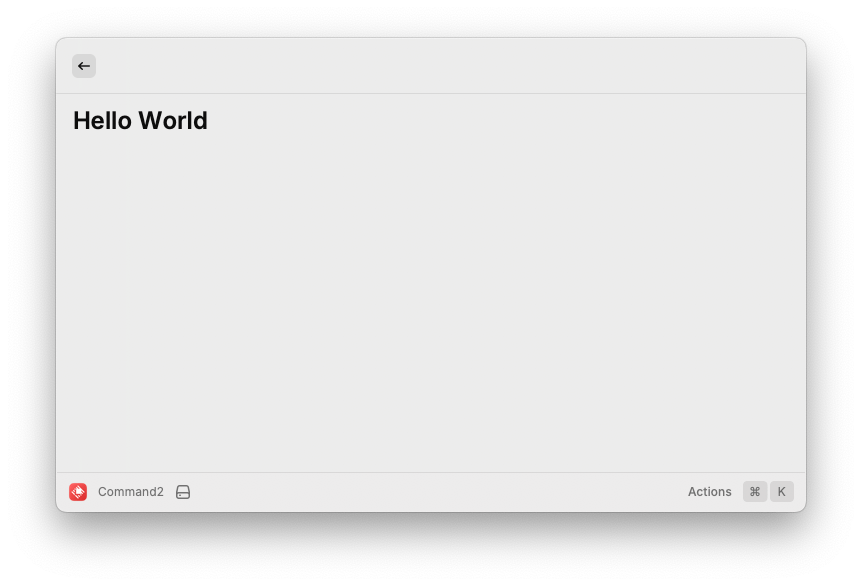
import { Detail } from "@raycast/api";

export default function Command() {
  return <Detail markdown="# Hello World" />;
}
- Submit Form
コマンド実行後、フォーム画面が表示されるテンプレートです。複数のコントロール (Text Field, Text Area, Date Picker, Check Box, Dropdown, Tag picker) が含まれます。基本的なGUIは網羅されているので、これらのコントロールをうまく組み合わせて簡単な入出力から、アプリケションレベルの高機能ツール間でカスタマイズが可能です。
import { Form, ActionPanel, Action, showToast } from "@raycast/api";

type Values = {
  textfield: string;
  textarea: string;
  datepicker: Date;
  checkbox: boolean;
  dropdown: string;
  tokeneditor: string[];
};

export default function Command() {
  function handleSubmit(values: Values) {
    console.log(values);
    showToast({ title: "Submitted form", message: "See logs for submitted values" });
  }

  return (
    <Form
      actions={
        <ActionPanel>
          <Action.SubmitForm onSubmit={handleSubmit} />
        </ActionPanel>
      }
    >
      <Form.Description text="This form showcases all available form elements." />
      <Form.TextField id="textfield" title="Text field" placeholder="Enter text" defaultValue="Raycast" />
      <Form.TextArea id="textarea" title="Text area" placeholder="Enter multi-line text" />
      <Form.Separator />
      <Form.DatePicker id="datepicker" title="Date picker" />
      <Form.Checkbox id="checkbox" title="Checkbox" label="Checkbox Label" storeValue />
      <Form.Dropdown id="dropdown" title="Dropdown">
        <Form.Dropdown.Item value="dropdown-item" title="Dropdown Item" />
      </Form.Dropdown>
      <Form.TagPicker id="tokeneditor" title="Tag picker">
        <Form.TagPicker.Item value="tagpicker-item" title="Tag Picker Item" />
      </Form.TagPicker>
    </Form>
  );
}
- Show Grid
コマンド実行後、グリッド画面が表示されるテンプレートです。アイコンをグリッド表示し、選択するとアイコン名をクリップボードへコピーします。ReactのuseStateを使ってデータの状態管理を行なっています。
import { useState } from "react";
import { ActionPanel, Action, Icon, Grid, Color } from "@raycast/api";

export default function Command() {
  const [columns, setColumns] = useState(5);
  const [isLoading, setIsLoading] = useState(true);
  return (
    <Grid
      columns={columns}
      inset={Grid.Inset.Large}
      isLoading={isLoading}
      searchBarAccessory={
        <Grid.Dropdown
          tooltip="Grid Item Size"
          storeValue
          onChange={(newValue) => {
            setColumns(parseInt(newValue));
            setIsLoading(false);
          }}
        >
          <Grid.Dropdown.Item title="Large" value={"3"} />
          <Grid.Dropdown.Item title="Medium" value={"5"} />
          <Grid.Dropdown.Item title="Small" value={"8"} />
        </Grid.Dropdown>
      }
    >
      {!isLoading &&
        Object.entries(Icon).map(([name, icon]) => (
          <Grid.Item
            key={name}
            content={{ value: { source: icon, tintColor: Color.PrimaryText }, tooltip: name }}
            title={name}
            subtitle={icon}
            actions={
              <ActionPanel>
                <Action.CopyToClipboard content={icon} />
              </ActionPanel>
            }
          />
        ))}
    </Grid>
  );
}
- Show List and Detail
コマンド実行後、リスト画面が表示されるテンプレートです。リスト選択後、markdown記法でHey!と表示します。ほぼロジックなしの簡易リストです。
import { ActionPanel, Detail, List, Action, Icon } from "@raycast/api";

export default function Command() {
  return (
    <List>
      <List.Item
        icon={Icon.Bird}
        title="Greeting"
        actions={
          <ActionPanel>
            <Action.Push title="Show Details" target={<Detail markdown="# Hey! 👋" />} />
          </ActionPanel>
        }
      />
    </List>
  );
}
- Update Bookmarks
コマンド実行後、OSXのメニューバーにブックマークアイコンが表示されるテンプレート。クリックするとメニューを表示します。これはクール!

import { useEffect, useState } from "react";
import { Icon, MenuBarExtra, open } from "@raycast/api";
import { getFavicon } from "@raycast/utils";

type Bookmark = { name: string; url: string };

const useBookmarks = () => {
  const [state, setState] = useState<{ unseen: Bookmark[]; seen: Bookmark[]; isLoading: boolean }>({
    unseen: [],
    seen: [],
    isLoading: true,
  });
  useEffect(() => {
    (async () => {
      setState({
        unseen: [{ name: "Raycast Teams", url: "https://raycast.com/teams" }],
        seen: [
          { name: "Raycast Store", url: "https://raycast.com/store" },
          { name: "Twitter", url: "https://twitter.com" },
        ],
        isLoading: false,
      });
    })();
  }, []);
  return state;
};

export default function Command() {
  const { unseen: unseenBookmarks, seen: seenBookmarks, isLoading } = useBookmarks();

  return (
    <MenuBarExtra icon={Icon.Bookmark} isLoading={isLoading}>
      <MenuBarExtra.Item title="New" />
      {unseenBookmarks.map((bookmark) => (
        <MenuBarExtra.Item
          key={bookmark.url}
          icon={getFavicon(bookmark.url)}
          title={bookmark.name}
          onAction={() => open(bookmark.url)}
        />
      ))}
      <MenuBarExtra.Separator />
      <MenuBarExtra.Item title="Seen" />
      {seenBookmarks.map((bookmark) => (
        <MenuBarExtra.Item
          key={bookmark.url}
          icon={getFavicon(bookmark.url)}
          title={bookmark.name}
          onAction={() => open(bookmark.url)}
        />
      ))}
    </MenuBarExtra>
  );
}
- Run Script
コマンド実行後、画面が表示されず、クリップボードに今日の日付をコピーするテンプレートです。TypeScriptだけのシンプルなテンプレート。バックグラウンドでいろいろできそう。
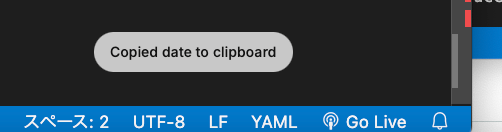
import { showHUD, Clipboard } from "@raycast/api";

export default async function main() {
  const now = new Date();
  await Clipboard.copy(now.toLocaleDateString());
  await showHUD("Copied date to clipboard");
}
- Show List
コマンド実行後、リスト画面が表示されるテンプレートです。選択するとタイトルをクリップボードへコピーします。配列をmap展開するロジック入りのリストです。
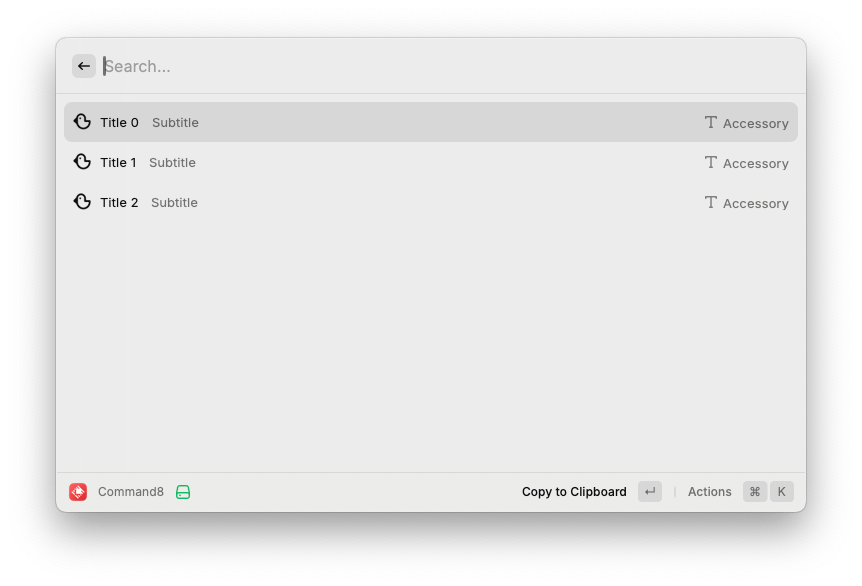
import { ActionPanel, Action, Icon, List } from "@raycast/api";

const ITEMS = Array.from(Array(3).keys()).map((key) => {
  return {
    id: key,
    icon: Icon.Bird,
    title: "Title " + key,
    subtitle: "Subtitle",
    accessory: "Accessory",
  };
});

export default function Command() {
  return (
    <List>
      {ITEMS.map((item) => (
        <List.Item
          key={item.id}
          icon={item.icon}
          title={item.title}
          subtitle={item.subtitle}
          accessories={[{ icon: Icon.Text, text: item.accessory }]}
          actions={
            <ActionPanel>
              <Action.CopyToClipboard content={item.title} />
            </ActionPanel>
          }
        />
      ))}
    </List>
  );
}
- Show Typeahead Results
コマンド実行後、画面が表示されるテンプレートです。npm module を検索するAPI(ttps://api.npms.io/v2/search?) を使ってnpm をサジェスト検索すします。初期値は “@raycast/api”。検索結果のリストを選択すると、ブラウザを開き検索結果に遷移する。Async/Await による非同期処理を含む比較的複雑なテンプレートです。
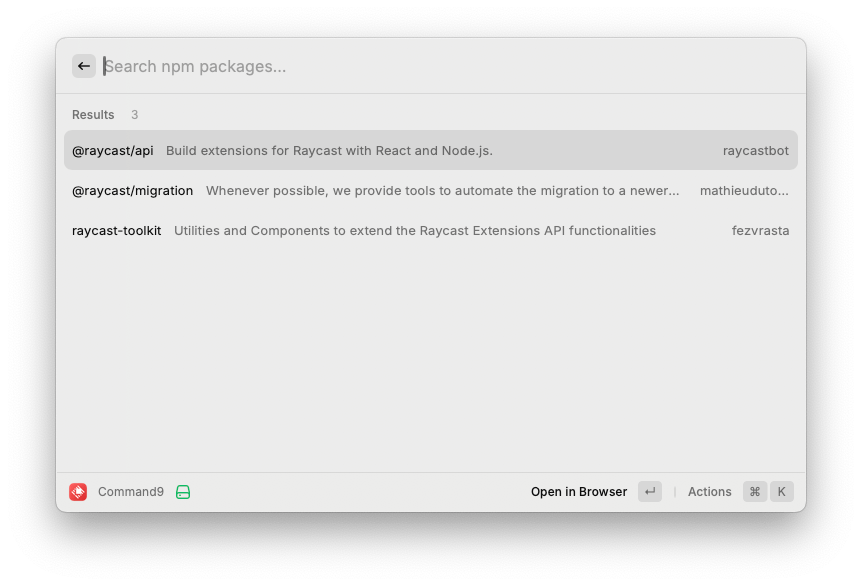
import { ActionPanel, Action, List } from "@raycast/api";
import { useFetch } from "@raycast/utils";
import { useState } from "react";
import { URLSearchParams } from "node:url";

export default function Command() {
  const [searchText, setSearchText] = useState("");
  const { data, isLoading } = useFetch(
    "https://api.npms.io/v2/search?" +
      // send the search query to the API
      new URLSearchParams({ q: searchText.length === 0 ? "@raycast/api" : searchText }),
    {
      parseResponse: parseFetchResponse,
    },
  );

  return (
    <List
      isLoading={isLoading}
      onSearchTextChange={setSearchText}
      searchBarPlaceholder="Search npm packages..."
      throttle
    >
      <List.Section title="Results" subtitle={data?.length + ""}>
        {data?.map((searchResult) => <SearchListItem key={searchResult.name} searchResult={searchResult} />)}
      </List.Section>
    </List>
  );
}

function SearchListItem({ searchResult }: { searchResult: SearchResult }) {
  return (
    <List.Item
      title={searchResult.name}
      subtitle={searchResult.description}
      accessories={[{ text: searchResult.username }]}
      actions={
        <ActionPanel>
          <ActionPanel.Section>
            <Action.OpenInBrowser title="Open in Browser" url={searchResult.url} />
          </ActionPanel.Section>
          <ActionPanel.Section>
            <Action.CopyToClipboard
              title="Copy Install Command"
              content={`npm install ${searchResult.name}`}
              shortcut={{ modifiers: ["cmd"], key: "." }}
            />
          </ActionPanel.Section>
        </ActionPanel>
      }
    />
  );
}

/** Parse the response from the fetch query into something we can display */
async function parseFetchResponse(response: Response) {
  const json = (await response.json()) as
    | {
        results: {
          package: {
            name: string;
            description?: string;
            publisher?: { username: string };
            links: { npm: string };
          };
        }[];
      }
    | { code: string; message: string };

  if (!response.ok || "message" in json) {
    throw new Error("message" in json ? json.message : response.statusText);
  }

  return json.results.map((result) => {
    return {
      name: result.package.name,
      description: result.package.description,
      username: result.package.publisher?.username,
      url: result.package.links.npm,
    } as SearchResult;
  });
}

interface SearchResult {
  name: string;
  description?: string;
  username?: string;
  url: string;
}
ステップ2: 機能拡張のカスタマイズ
例えば、特定のAPIからデータを取得して表示する機能拡張を作成する場合、「Submit Form」のテンプレートをカスタマイズして、テキストフィールドから入力したデータをAPIに渡し、取得したデータをテキストエリアに出力することができます。 以下の例は「Submit Form」のテンプレートに下記の変更を行なっています。 ・APIのデータを保持できるよう、react の useState を使用 ・description を AI のモデル (GPT4o mini) に設定する。 ・api key を渡すため password field を追加 (データは保持しない)。 ・data picker, checkbox, dropdown, tag picker を削除 ・main関数を追加し、input field の内容を OpenAI の API に渡し、回答内容を日本語で output area に出力する。
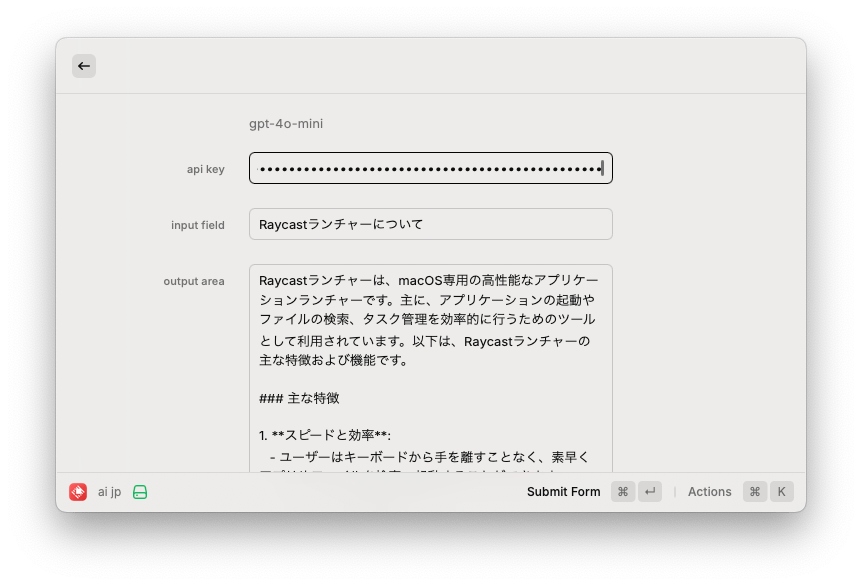
import { useState } from "react";
import { Form, ActionPanel, Action, showToast } from "@raycast/api";
import OpenAI from 'openai';

type Values = {
  passwordfield: string;
  textfield: string;
  textarea: string;
};

export default function Command() {
  const [output, setOutput] = useState<string>('');
  const modelName='gpt-4o-mini';

  async function main(values: Values) {
    const openai = new OpenAI({
      apiKey: values.passwordfield.toString(),
    });

    try {
      const chatCompletion = await openai.chat.completions.create({
        messages: [{ role: 'user', content: values.textfield + 'を日本語で出力してください' }],
        model: modelName,
      });
      const outputContent = chatCompletion.choices[0].message.content;
      if (outputContent !== null) {
        setOutput(outputContent);
      }
    } catch (error: any) {
      showToast({
        title: "Something went wrong",
        message: error.message,
      });
    }
  }

  function handleSubmit(values: Values) {
    console.log(values);
    main(values);
  }

  return (
    <Form
      actions={
        <ActionPanel>
          <Action.SubmitForm onSubmit={handleSubmit} />
        </ActionPanel>
      }
    >
      <Form.Description text={modelName} />
      <Form.PasswordField id="passwordfield" title="api key" placeholder="Enter api key" />
      <Form.TextField id="textfield" title="input field" placeholder="Enter text" defaultValue="Raycastランチャーについて" />
      <Form.TextArea id="textarea" title="output area" value={output} />
    </Form>
  );
}
ステップ3: 設定ファイルの編集
package.jsonファイルを編集して、機能拡張のメタデータや設定をカスタマイズします。例えば、アイコンやtitle、descriptionの設定を行います。
{
  "$schema": "https://www.raycast.com/schemas/extension.json",
  "name": "test-extention",
  "title": "Test Extention",
  "description": "Extention の説明",
  "icon": "extension-icon.png",
  "author": "Your Name",
  "categories": [
    "Applications"
  ],
  "license": "MIT",
  "commands": [
    {
      "name": "command1",
      "title": "Command1",
      "subtitle": "Blank",
+      "description": "Command1 の説明の変更",
-      "description": "Command1 の説明",
      "mode": "no-view"
    },
    {
      "name": "command2",
      "title": "Command2",
      "subtitle": "Show Detail",
      "description": "Command2の説明",
      "mode": "view"
    },
    {
      "name": "command3",
      "title": "Command3",
      "subtitle": "Submit Form",
      "description": "Command3の説明",
      "mode": "view"
    },
    {
      "name": "command4",
      "title": "Command4",
      "subtitle": "Show Grid",
      "description": "Command4の説明",
      "mode": "view"
    },
    {
      "name": "command5",
      "title": "Command5",
      "subtitle": "Show List and Detail",
      "description": "Command5の説明",
      "mode": "view"
    },
    {
      "name": "command6",
      "title": "Command6",
      "subtitle": "Update Bookmarks",
      "description": "Command6 の説明",
      "mode": "menu-bar"
    },
    {
      "name": "command7",
      "title": "Command7",
      "subtitle": "Run Script",
      "description": "Command7 の説明",
      "mode": "no-view"
    },
    {
      "name": "command8",
      "title": "Command8",
      "subtitle": "Show List",
      "description": "Command8 の説明",
      "mode": "view"
    },
    {
      "name": "command9",
      "title": "Command9",
      "subtitle": "Show Typeahead Results",
      "description": "Command9 の説明",
      "mode": "view"
    }
  ],
  "dependencies": {
    "@raycast/api": "^1.81.2",
    "@raycast/utils": "^1.16.3"
  },
  "devDependencies": {
    "@raycast/eslint-config": "^1.0.8",
    "@types/node": "20.8.10",
    "@types/react": "18.3.3",
    "eslint": "^8.57.0",
    "prettier": "^3.3.3",
    "typescript": "^5.4.5"
  },
  "scripts": {
    "build": "ray build -e dist",
    "dev": "ray develop",
    "fix-lint": "ray lint --fix",
    "lint": "ray lint",
    "prepublishOnly": "echo \"\\n\\nIt seems like you are trying to publish the Raycast extension to npm.\\n\\nIf you did intend to publish it to npm, remove the \\`prepublishOnly\\` script and rerun \\`npm publish\\` again.\\nIf you wanted to publish it to the Raycast Store instead, use \\`npm run publish\\` instead.\\n\\n\" && exit 1",
    "publish": "npx @raycast/api@latest publish"
  }
}
変更した内容はリアルタイムで設定画面に反映されます。上記 Command1 の description を変更した例です。
4. 機能拡張の実行とテスト
ステップ1: 開発モードでの実行
機能拡張を開発モードで実行してテストします。CLIから以下のコマンドを実行することで、Raycastで直接機能拡張をロードしてテストすることができます。
npm install && npm run devステップ2: デバッグと修正
実行結果を確認し、必要に応じてコードを修正します。Raycastはリアルタイムで変更を反映するので、変更後に再度raycast runコマンドを実行してテストを繰り返します。
5. 機能拡張の公開
機能拡張のテストが完了したら、Raycastのストアに公開します。 こちらは他の記事を参考にして下さい。
ステップ1: リポジトリの設定
GitHubのリポジトリを作成し、機能拡張のコードをプッシュします。RaycastはGitHubのリポジトリを使って拡張機能を管理するため、リポジトリの設定が必要です。
ステップ2: 公開リクエストの送信
Raycastの公式ドキュメントに従い、機能拡張の公開リクエストを送信します。 Raycastチームがレビューし、問題がなければストアに公開されます。
まとめ
Raycastの「Create Extension」機能を使用することで、自分のワークフローに最適なカスタム機能拡張を作成できます。この記事では、テンプレートの作例を使用して、基本的な作成方法と実行方法について解説しました。これを参考にして、独自の機能拡張を作成し、日々の作業をさらに効率化していきましょう。
SingularitySociety は Raycast Community Japan を応援しています。